- Download the Nano Server Image Builder at Microsoft’s website (Download Center) by clicking the Download button.
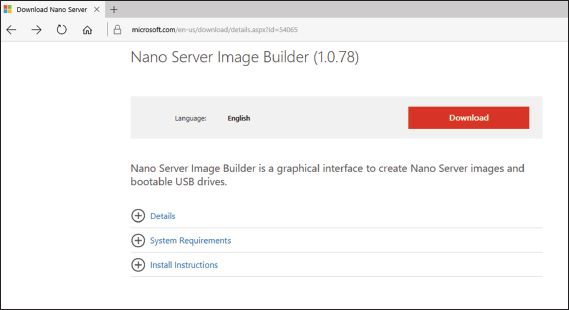
Nano Server Image Builder - A file named
NanoServerImageBuilder.msiwill be created. Double-click on the file. If an Open File Security Warning Dialog box appears, click the Run button. - The Nano Server Image Builder Setup wizard will begin. Click Next at the intro screen.
- At the Licensing screen, click the I accept the terms checkbox and click Next.
- At the Destination Folder screen, choose the directory where you want to install the Nano Server Image Builder files . Click Next.
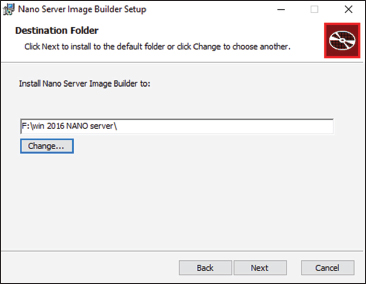
Nano Server Image Builder Destination - At the Ready to Install screen, click the Install Button. If a User Account Control box appears, click the Yes button.
- Once the Installation is complete, click the Finish Button.
- Open Windows Explorer and go to the destination folder that you chose in step 5. Double-click the
NanoServerImageBuilder.exefile. If a UAC dialog box appears, click Yes. - For the Image Builder to work, you must also download the Windows ADK kit. This can be done at Hardware Dev Center. Click the get Windows ADK Download button.
- It will ask you if you want to run or save the file. I saved the file to the same destination folder as the Nano Server Image Builder. Once it’s downloaded, double-click the
adksetup.exefile. If a dialog box appears, click Run. - Specify the destination of where you want the Windows ADK files to install and click Next.
- At the Windows Kit Privacy screen, you can choose either option. By choosing Yes, you will participate in Microsoft’s feedback program. For this exercise, I chose No. Click Next.
- At the License Agreement screen, click Accept.
- At the Features screen, accept the defaults and click Install. If a UAC screen appears, click Yes.
- After the installation is complete, click the Close button.
- Double-click on the
NanoServerImageBuilder.exefile. When the UAC screen appears, click Yes. - So we now have the ability to create a Nano Server image or a bootable USB. We are going to create an Image. So click on the top choice “Create a new Nano Server image” .
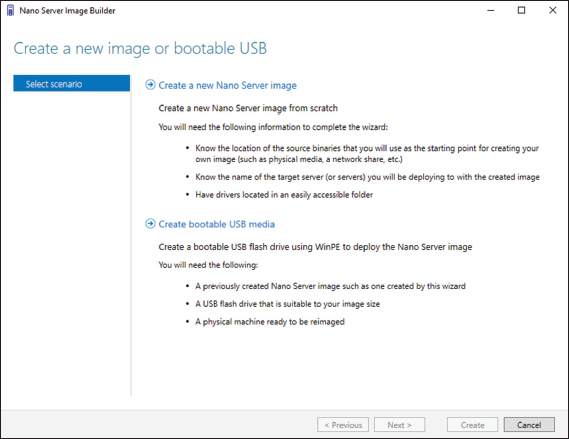
Nano Server Image Choice - At the Before you begin screen, click Next.
- At the Select Installation Media screen, point the folder to your Windows Server 2016 installation files where the NanoServer Folder resides. Click Next.
- At the License agreement screen, click the box that states I have read and agree to the terms. Then click Next.
- At the Deployment type screen. I am going to choose to create a Virtual machine image . I am keeping the default of 8 GB and I am placing the VHD in my Win 2016 Nano Server folder . Click Next.
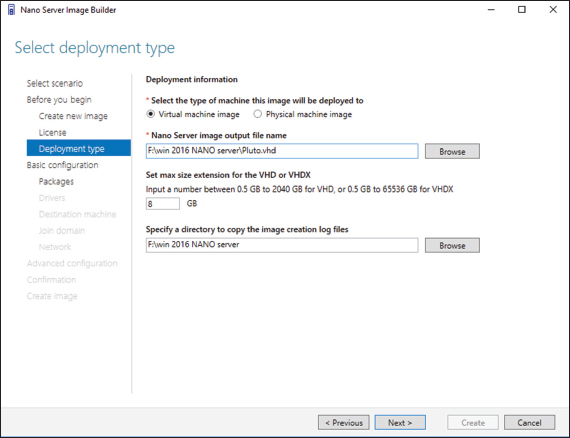
Deployment Type - At the Basic Installation screen, click Next.
- At the Select Optional Packages screen, you can choose any other options you want to install like DNS, IIS, etc. I am just going to click Next.
- At the Drivers screen, add any drivers that may be needed for your installation and click Next.
- Next the Destination screen will appear. Here is where you will enter the name of the computer and the Administrator’s password. Make sure your Time Zone is correct and click Next.
- At this time, I am not going to join a domain. So I am just going to click Next.
- I will leave the default network settings and click Next.
- At the Advanced Configuration Screen, I am going to choose the top option “Create a Basic Nano Server Image”
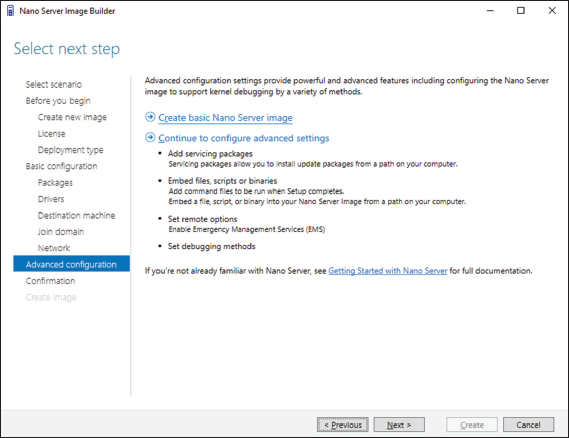
Advanced Configuration Screen - After you click the link, it will automatically take you to a Confirmation screen. Just click the Create button.
- Once the image is complete, click the Close button.
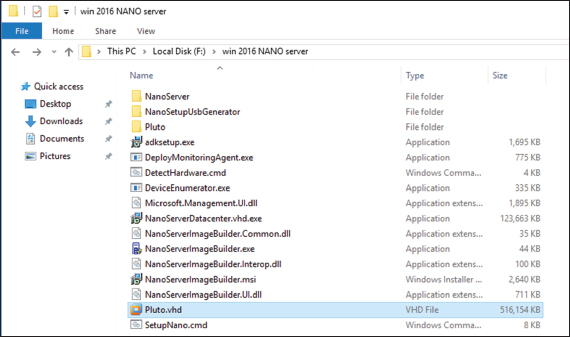
- Open Windows Explorer and go to the folder where you created the VHD (see Figure 1.16). Make sure the VHD (My VHD is named Pluto.vhd) has been created. You can now run this VHD in Microsoft Hyper-V.
Total Pageviews
Tuesday, March 3, 2020
Installing Nano Server Step by Step
Sunday, March 1, 2020
Stop Annoying Beep Sound When Connecting Power Source - ACER 4740 - Win 7
Stop Annoying Beep Sound When Connecting Power Source - ACER 4740 - Win 7
The problem is the Realtek Audio Drivers. Windows doesn't have a sound for the event so it supplies the old-school default beep.
Go to Device Manager>Sound, Video & Game Controllers> and uninstall the Realtek device (choose to delete the drivers as well). Then click "Scan for HW changes" and let the Windows default driver install.
Thursday, February 27, 2020
MCSA Windows Server 2016 from uCertify
MCSA 70-740 :
Preparing for the exam:
Why uCertify :
Link: https://www.ucertify.com/exams/Microsoft/70-740.html
The MCSA 70-740 Installation, Storage, and Compute with Windows Server 2016 certification exam verifies candidate's fundamental knowledge and skills of working with the Windows Server 2016. Microsoft MCSA 70-740 exam is designed for candidates who want to build their career in the Windows Server domain and enables them to utilize Windows Server to manage the IT infrastructure. The Microsoft 70-740 exam involves individuals in installation, storage, and computing functionalities accessible in Windows Server 2016.
Preparing for the exam:
Why uCertify :
Prepare for the Microsoft MCSA 70-740 certification exam with the MCSA Windows Server 2016 course and lab. The lab can be mapped to any course, textbook, or training, therefore, adding value and hands-on components to training.
The course and lab will help you master the skills required to install, upgrade, and migrate servers; create and manage images; implement server storage; install and configure Hyper-V; manage windows containers; maintain and monitor server installations, and more.
I must say this is well organized & it has all the tools which require you to get hands-on experience & it will really help you to get certify within a short time
In the beginning of this course you will have a pre assessment test to check your current knowledge in server 2016. So this is a definite advantage to you to check where you are at the moment so you can prepare according to your current knowledge.
When you move through the chapters & lessons you will get well organised content & this includes video tutorials, cards, quizzes & labs as well. The materials is sorted according to the Microsoft outlines so students will learn the same way of the real certification materials and on each topic
The most important part of this course is the LAB where you will able to get your hands dirty.
You can work with the virtual machines on your desktop just like how you would work it on your virtual machine or your real hardware. It's a big advantage for those who can't afford to install virtual machines on their machines or need some time to getting familiar with windows server before installing it on their own machines.
Last one is practice tests where you can test your knowledge to 180 questions simulated test environments. Your goal is to master them all, but keeping it at your pace. You can stop at any time and continue later when you have time.
Overall, i'm happy with this prep kit. uCertify has done a great job on preparing students to prepare themselves to get MCSA certified with their excellent prepkit. I would suggest you to take this course seriously if you are considering to plunge into Server side.
Link: https://www.ucertify.com/exams/Microsoft/70-740.html
Tuesday, June 4, 2019
HTC U ULTRA - Unlocking Your Bootloader
Unlocking Your Bootloader
First manually enable OEM unlocking in Developer options in order to allow the bootloader to be unlocked
Login to the https://www.htcdev.com/bootloader/ & create a account & log int to the dev site.
you have to select the phone model from here
First manually enable OEM unlocking in Developer options in order to allow the bootloader to be unlocked
Login to the https://www.htcdev.com/bootloader/ & create a account & log int to the dev site.
you have to select the phone model from here
since HTC U Ultra is not listed there you have to go with the All Other Suported Model option
Click on begin to unlock your boot loader & click yes
Make sure to download android SDK & Java runtime & usb drivers before proceed
Step 1
After powering down, press Volume Down and while pressing Volume Down, press Power holding both buttons to start the device into Bootloader mode (now Download mode for One M9 and newer devices). If you have difficulty, power up normally, go to Settings->Battery and deselect Fast boot. Power down and try again.
Step 2
Use the Volume buttons to select up or down. Highlight Fastboot and press the Power button.
NOTE: All new HTC devices shipped since One M9 support download mode instead of bootloader mode for this step. And for select HTC devices with Android Lollipop and all devices that receive Marshmallow, you will need to first manually enable OEM unlocking in Developer options in order to allow the bootloader to be unlocked and proceed with the next steps. To access the OEM unlocking setting on your device, open the Developer options in the system Settings. On Android 4.2 and higher, the Developer options screen is hidden by default. To make it visible, go to Settings > About > Software information > More and tap Build number seven times. Return to the Settings screen to find Developer options and check OEM unlocking
Step 3
Connect the device to the computer via a usb cable
Step 4
Download these bineries from the below link
https://www.htcdev.com/process/legal_fastboot_win <- for Windows computer
https://www.htcdev.com/process/legal_fastboot_mac <- For Mac computer
Step 5
Open a command Prompt: Windows: Start->"cmd" Mac: Applications->Utilities->Terminal.app Linux: Terminal
Type in Command Prompt: fastboot oem get_identifier_token
PS: If this doesn't work you have to set android environment variables in your PC correctly
Step 6
You will see a long block of text. Copy and paste this text into the the token field below (in the Windows command prompt: Right Click > Mark > highlight the block of text > Right click to copy. Mac users can use cmd-option to mark and select text.).
You will see one of the following :
When copying the token, start with this line:
<<<< Identifier Token Start >>>>
And end with this line:
<<<<< Identifier Token End >>>>>
(Note: Only copy the highlighted sections above. Do not copy the INFO or (bootloader) prefix)
Step 7
Paste this string of text into the token field and hit Submit in order to receive your unlock code binary file. You will receive this information in your email.
Submit the toke to below link
https://www.htcdev.com/bootloader/unlock-instructions/page-2#
you will get a email from HTC dev with a unique token
Step 8
You will receive an email with the attachment: Unlock_code.bin. Save this file in the same folder as your fastboot files (For Example: C:\Android).
If, after a short period of time, you have not yet received the mail, or you have received an email from HTC, but does not contain an attached file, it is possible that more stringent spam filters and anti-virus programs will block this mail or attachment.
In order to ensure that you receive the email with the attachment, we suggest you consider using a non-corporate email server as corporate servers tend to have more stringent attachment policies. If you have not received the email at all, please check your spam folder in your email client to check if the email was filtered out.
Step 9
In the command prompt type: fastboot flash unlocktoken Unlock_code.bin. In the command prompt you will see the following message:
Step 10
On your phone you will now see the disclaimer. Please read this carefully as this action may void your warranty. Use the Volume buttons to highlight your choice, and the Power button to make your selection. If you select Yes, your phone will be reset to its’ factory default settings, and your bootloader will be unlocked. If you select No, your phone will reboot and no modifications will have been made.
Step 11
To re-lock your bootloader, in the command prompt, type: fastboot oem lock.
Note: This will not restore the factory default lock, but will simply re-lock the bootloader so no further changes can be made. Furthermore, if you want to unlock your bootloader again, simply repeat step 9 with your original unlock key file to unlock your phone again.
You're Ready To Go!
Congratulations! You have successfully unlocked your bootloader. Browse this site for further sample codes, examples, and tips.
Credits (ref): https://www.htcdev.com
Monday, June 3, 2019
[Powershell] Managing O365 with Powershell
1) Installing the O365 online module
- Download Powershell online module from this link : http://aka.ms/t01i1o
- Under Microsoft Online Services Sign-In Assistant for IT Professionals RTW, click Download.
- select the en\msoidcl_64.msi check box, click Next, and then click Save.Wait for the download to finish.When the download finishes, click Run.
- In the Microsoft Online Services Sign-in Assistant Setup wizard, click I accept the terms in the license Agreement and Privacy Statement, and then click Install.If a User Account Control dialog box appears, click Yes.
- On the Completed the Microsoft Online Services Sign-in Assistant Setup Wizard page, click Finish.
- Then Right click on Start and click Windows PowerShell (Admin)
- At the prompt, type Install-ModuleMSOnline command.
- If prompted to install the NuGet provider, type Y and press ENTER.
- If prompted to install the module from PSGallery, type Y and press ENTER
- At the Powershell, type the following command to connect
Connect-MsolService
- In the Enter Credentials dialog box sign in
2.1) Create New User
New-MsolUser -UserPrincipalName Catherine@LODSA904072.onmicrosoft.com -DisplayName "Catherine Richard" -FirstName "Catherine" -LastName"Richard" -Password 'Pa55w.rd' -ForceChangePassword $false -UsageLocation "CH"
2.2) Checking the un-licensed user
Get-MsolUser -UnlicensedUsersOnly
2.3) View the available licenses
Get-MsolAccountSku
2.4) Add Licenses to a user
Set-MsolUserLicense –UserPrincipalName catherine@LODSA904072.onmicrosoft.com - AddLicenses "LODSAxxxxxx:ENTERPRISEPREMIUM"
2.5) Prevent a user from signing in
Set-MsolUser -UserPrincipalNameCatherine@LODSA904072.onmicrosoft.com -BlockCredential $true
2.6) To allow a user to sign in
Set-MsolUser -UserPrincipalNameCatherine@LODSA904072.onmicrosoft.com -BlockCredential $false
Remove-MsolUser -UserPrincipalNameCatherine@LODSA904072.onmicrosoft.com -Force
2.8) view the Deleted Users
Get-MsolUser -ReturnDeletedUsers
2.9) Restore a deleted user
Restore-MsolUser -UserPrincipalNameCatherine@LODSA904072.onmicrosoft.com
Get-MsolUser
3) Modify user accounts
3.1) To bulk import several users from a comma-separated value (CSV) file
Import-Csv -PathC:\labfiles\O365Users.csv | ForEach-Object { New-MsolUser -UserPrincipalName$_."UPN" -FirstName $_."FirstName" -LastName $_."LastName" -DisplayName$_."DisplayName" -BlockCredential $False-ForceChangePassword $False -Password$_."Password" -PasswordNeverExpires$True -Title $_."Title" -Department$_."Department" -Office $_."Office" -PhoneNumber $_."PhoneNumber" -MobilePhone $_."MobilePhone" -StreetAddress $_."StreetAddress" -City$_."City" -State $_."State" -PostalCode$_."PostalCode" -Country $_."Country" }
It is recommended that you use the type/text
feature in a Notepad first and from there to copy and then
paste this code into your PowerShell session.
4) Configure groups and group membership
4.1) Create a group
New-MsolGroup -DisplayName "Marketing" -Description "Marketing
department users"
4.2) Configure a variable for the group add user to the group
$MktGrp = Get-MsolGroup | Where-Object{$_.DisplayName -eq "Marketing"}
$Catherine = Get-MsolUser | Where-Object{$_.DisplayName -eq "Catherine
Richard"}
Add-MsolGroupMember -GroupObjectId$MktGrp.ObjectId -GroupMemberType "User"-GroupMemberObjectId $Catherine.ObjectId
4.3) To verify the members of the group
Get-MsolGroupMember -GroupObjectId$MktGrp.ObjectId
5) Configure user passwords
5.1) Set Passwords
Set-MsolUserPassword -UserPrincipalName"Tameka@LODSA904072.onmicrosoft.com" -NewPassword 'Pa55w.rd'
5.2) Set password to never expire
Get-MsolUser | Set-MsolUser -PasswordNeverExpires $false
6) Manage service administration
6.1) Assigning Roles
Add-MsolRoleMember -RoleName "Service
Support Administrator" -RoleMemberEmailAddress"Sallie@LODSA904072.onmicrosoft.com"
Add-MsolRoleMember -RoleName "Company
Administrator" -RoleMemberEmailAddress"Amy@LODSA904072.onmicrosoft.com"
6.2) Get the members who has Service Support Administrator role assigned
$role = Get-MsolRole -RoleName "Service
Support Administrator"
Get-MsolRoleMember -RoleObjectId$role.ObjectId
Tuesday, March 12, 2019
Kerberos Token Bloat (MaxTokenSize)
How to reduce Kerberos token bloat
To reduce the Kerberos Ticket Size you can:
- Reduce group membership(No need to reduce DLs , Mostly security groups)
- Clean up SID History
- Limit the number of users that are configured to use "trusted for delegation". The account that are configured to use "trusted for delegation" the buffer requirements for each SID may double
How to prevent Kerberos login errors due to token bloat
To allow a user to be a member of more than 900 groups you can increase the size of the MaxTokenSize by modify the following registry key on all workstations.
To use this parameter:
- Start Registry Editor (Regedt32.exe).
- Locate and click the following key in the registry: System\CurrentControlSet\Control\Lsa\Kerberos\Parameters
- If this key is not present, create the key. To do so:
- Click the following key in the registry: System\CurrentControlSet\Control\Lsa\Kerberos
- On the Edit menu, click Add Key.
- Create a Parameters key.
- Click the new Parameters key.
- On the Edit menu, click Add Value, and then add the following registry value:
Value name: MaxTokenSizeData type: REG_DWORDRadix: DecimalValue data: 48000
Subscribe to:
Comments (Atom)
Azure Pricing
Azure offers pay-as-you-go and reserved instances for pricing. Azure Pricing Factors: Resource size and resource type. Different Azure loc...
-
Configure RAID 5 on Dell T320 Server with 3 hard disks 1) Go to the raid configuration utility first (Ctrl + R). You can see the butto...
-
Configure RAID 5 on Dell T320 Server with 3 hard disks 1) Go to the raid configuration utility first (Ctrl + R). You can see the butto...
-
Unlocking Your Bootloader First manually enable OEM unlocking in Developer options in order to allow the bootloader to be unlocked Logi...


